This article will explain what Voice over LTE (VoLTE) is and how you can use it with your iiNet Mobile SIM plan and a compatible mobile handset.
Select one of the links below to jump to a query:
- What is Voice over LTE (VoLTE)?
- Setup videos
- Devices compatible with VoLTE
- Where is VoLTE available?
- Does it cost extra to use VoLTE?
- How do I know when I'm using VoLTE?
- Can I use VoLTE on a 5G-compatible device?
- Can I use VoLTE to call emergency services?
What is Voice over LTE (VoLTE)?
Voice over LTE (VoLTE) is a feature that allows you to call using our 4G network. It allows you to remain connected to the 4G network during calls, which means you can continue using 4G mobile data while making and receiving calls.
To use VoLTE you need a compatible device with VoLTE settings enabled.
Setup videos
How to enable VoLTE on a Samsung phone
If you have a Samsung device, Voice over LTE should automatically be enabled. To manually enable, go to Settings > Mobile Networks.
How to enable VoLTE on an iPhone
If you have an Apple device iPhone 6 or later, Voice over LTE should be automatically enabled. To manually enable, go to Settings > Mobile > Mobile Data options > Voice and Data.
Devices compatible with VoLTE
This list applies to current Apple and Android devices purchased in Australia. If you either (a) purchased a device that is not part of this list (b) purchased your device overseas, or (c) purchased a Samsung, Sony or HTC device from another Australian telecommunication provider before 2017, your device may not be VoLTE compatible on our network. Make sure you check your device model and your tax invoice for the country of purchase, as applicable, to determine if your device is VoLTE compatible.
Alcatel
- 1 2019 4G
- 1B 2020 4G
- 1V 2020 4G
- 3L 2020 4G
- 1S 2021 4G
Apple
- iPhone 11/iPhone 11 Pro/iPhone 11 Pro Max
- iPhone 12/iPhone 12 mini/iPhone 12 Pro/iPhone 12 Pro Max
- iPhone 13/iPhone 13 mini/iPhone 13 Pro/iPhone 13 Pro Max
- iPhone 14/iPhone 14 Plus/iPhone 14 Pro/iPhone 14 Pro Max
- iPhone 15/iPhone 15 Plus/iPhone 15 Pro/iPhone 15 Pro Max
- iPhone 6/iPhone 6 Plus/iPhone 6s/iPhone 6s Plus
- iPhone 7/iPhone 7 Plus
- iPhone 8/iPhone 8 Plus
- iPhone SE/iPhone SE 2020
- iPhone X/iPhone XR/iPhone XS/iPhone XS Max
- Watch SE (GPS + Cellular)
- Watch Series 3/4/5/6/7/8/9 (GPS + Cellular)
- Watch Ultra/Ultra 2 (GPS + Cellular)
- Pixel 3/Pixel 3 XL/Pixel 3a
- Pixel 4/Pixel 4 XL/Pixel 4a
- Pixel 5
- Pixel 6/Pixel 6 Pro/Pixel 6a
- Pixel 7/Pixel 7 Pro
- Pixel 8/Pixel 8 Pro
HTC
- One X10 4G
Huawei
- P30 4G/P30 Pro 4G
- Y5 2018 4G
LG
- K42 4G
- Velvet 5G
Motorola
- Moto e7 4G/Moto e7 Power 4G
- Moto e13 4G
- Moto e22i 4G
- Moto edge20 fusion 5G
- Moto edge30 5G/Moto edge30 pro 5G
- Moto g 5G Plus
- Moto g8 4G
- Moto g10 4G
- Moto g14 4G
- Moto g34 5G
- Moto g50 5G
- Moto g62 5G
Nokia
- 110 4G
- 1 Plus 4G
- 8 4G
- 2720 Flip 4G
- C01 Plus 4G
- C02 4G
- G21 4G
- XR20 5G
OPPO
- A16s 4G
- A38 4G
- A57 4G
- A91 4G
- AX5 4G
- Find X2 Lite 5G
- Find X5 5G/Find X5 Lite 5G/Find X5 Pro 5G
- R15 Pro 4G
- R17 Pro 4G
- Reno Z 4G
- Reno8 5G
Samsung
- Galaxy A05s 4G
- Galaxy A11 4G
- Galaxy A12 4G
- Galaxy A13 4G/Galaxy A13 5G
- Galaxy A14 4G/Galaxy A14 5G
- Galaxy A20 4G
- Galaxy A22 5G
- Galaxy A30 4G
- Galaxy A32 5G
- Galaxy A33 5G
- Galaxy A34 5G
- Galaxy A35 5G
- Galaxy A5 2017 4G
- Galaxy A51 4G
- Galaxy A52 5G/Galaxy A52s 5G
- Galaxy A53 5G
- Galaxy A55 5G
- Galaxy A70 4G
- Galaxy A71 5G
- Galaxy A73 5G
- Galaxy A8 4G
- Galaxy Fold 4G
- Galaxy J2 Pro 4G
- Galaxy Note10 4G/Galaxy Note10+ 4G
- Galaxy Note20 5G/Galaxy Note20 5G/Galaxy Note20 Ultra 5G
- Galaxy Note8 4G
- Galaxy Note9 4G
- Galaxy S10 4G/Galaxy S10+ 4G/Galaxy S10e 4G
- Galaxy S20 4G/Galaxy S20 5G/Galaxy S20 FE 4G/Galaxy S20 FE 5G/Galaxy S20 Ultra 5G/Galaxy S20+ 4G/Galaxy S20+ 5G
- Galaxy S21 5G/Galaxy S21 Ultra 5G/Galaxy S21+ 5G
- Galaxy S22 5G/Galaxy S22 Ultra 5G/Galaxy S22+ 5G
- Galaxy S23 5G/Galaxy S23 Ultra 5G/Galaxy S23+ 5G/Galaxy S23 FE 5G
- Galaxy S24/Galaxy S24 Ultra/Galaxy S24+
- Galaxy S8 4G/Galaxy S8+ 4G
- Galaxy S9 4G/Galaxy S9+ 4G
- Galaxy Tab A 10.1 4G/Galaxy Tab A 10.5 2018 4G
- Galaxy Tab A 8.0 2017 4G/Galaxy Tab A7 2020 4G
- Galaxy Tab A9+ 5G
- Galaxy Tab S4 4G
- Galaxy Tab S5e 10.5 4G
- Galaxy Tab S6 10.5 4G
- Galaxy Tab S7 11.0 4G/Galaxy Tab S7+ 12.4 5G
- Galaxy Tab S8 11.0 5G/Galaxy Tab S8+ 12.4 5G/Galaxy Tab S8 Ultra 14.6 5G
- Galaxy Tab S9 11.0 5G/Galaxy Tab S9+ 12.4 5G/Galaxy Tab S9 Ultra 14.6 5G
- Galaxy Watch 4G
- Galaxy Watch Active2 4G
- Galaxy Watch3 4G
- Galaxy Watch4 4G/Galaxy Watch4 Classic 4G
- Galaxy Watch5 4G/Galaxy Watch5 Pro 4G
- Galaxy Watch6 4G/Galaxy Watch6 Classic 4G
- Galaxy Z Flip 4G/Galaxy Z Flip3 5G/Galaxy Z Flip4 5G/Galaxy Z Flip5 5G
- Galaxy Z Fold2 5G/Galaxy Z Fold3 5G/Galaxy Z Fold4 5G/Galaxy Z Fold5 5G
TCL
- 20 Pro 5G/20 R 5G
- 305 4G
Vodafone
- Vodafone Smart E9 4G
- Vodafone Smart N10 4G
- Vodafone V Lite 4G
- Vodafone V One 4G
- Vodafone V Pro 4G
- Vodafone V Smart 4G
Where is VoLTE available?
Voice over LTE is available wherever there is 4G coverage. Use our coverage checker to see where 4G coverage is available.
Does it cost extra to use VoLTE?
No. Voice over LTE is charged in the same way as all other voice calls and doesn’t use your mobile data allowance.
How do I know when I'm using VoLTE?
If you’re using an iPhone, ‘4G’ will be displayed in the status bar when using Voice over LTE.
If you’re using an Android device, ‘VoLTE’ will be displayed in the status bar beside the 4G icon.
Can I use VoLTE on a 5G-compatible device?
Yes, but your device will use our 4G network to access Voice over LTE.
Can I use VoLTE to call emergency services?
If your phone is listed above as being compatible with Voice over LTE, then you'll be able to make an emergency service call using VoLTE. If your phone isn't listed above, then emergency calls will be made using our 3G network where available or any other cellular network.
This article lists the phone numbers that iiNet gives to customers so they can call us.
Using the Find tool in your web browser can help you find a specific phone number on this page:
- On Windows desktop, use CTRL + F on your keyboard to open the Find tool.
- On Mac desktop, use Command + F on your keyboard to open the Find tool.
- On Android mobile, tap More options (the three dots in the top right) then Find in page.
- On iOS mobile, tap Share (the square icon with the upwards arrow at the bottom of the screen) then Find on page.
Phone numbers for you to call us
The following phone numbers are well known from our Contact us page:
- 13 19 17
- 13 22 58
- 13 86 89
- 1300 378 638
- 1300 634 515
- +61 8 9214 2222
You may receive an email or SMS asking you to call us on a different phone number. These unique numbers help you get through to the right team in our call centre to help you with a specific issue:
- 1300 002 004
- 1300 093 449
- 1300 094 761
- 1300 130 714
- 1300 281 542
- 1300 301 519
- 1300 304 263
- 1300 307 257
- 1300 308 407
- 1300 362 835
- 1300 367 429
- 1300 368 110
- 1300 368 910
- 1300 369 457
- 1300 395 526
- 1300 477 317
- 1300 499 790
- 1300 521 757
- 1300 530 224
- 1300 541 714
- 1300 553 496
- 1300 554 019
- 1300 554 713
- 1300 554 918
- 1300 558 695
- 1300 634 515
- 1300 634 795
- 1300 701 006
- 1300 704 371
- 1300 704 794
- 1300 704 984
- 1300 712 534
- 1300 712 583
- 1300 712 761
- 1300 712 930
- 1300 718 031
- 1300 718 092
- 1300 718 367
- 1300 784 708
- 1300 795 471
- 1300 796 025
- 1300 796 137
- 1300 796 493
- 1300 849 926
- 1300 858 965
- 1300 860 925
- 1300 861 036
- 1300 880 598
- 1300 992 863
- 1300 993 571
- 1300 993 572
- 1300 993 574
- 1300 993 578
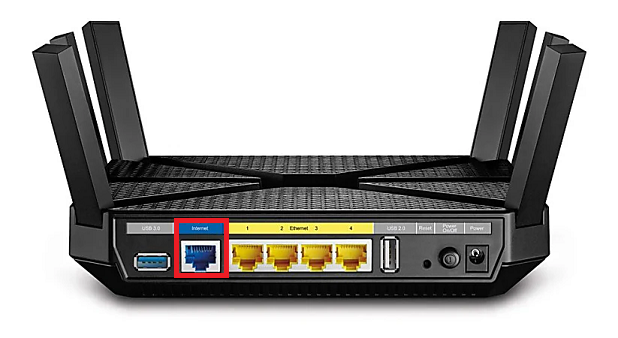
Please follow the steps below to set up your TP-Link AX6000.
- Ensure your nbn Connection Device is turned on.
- Plug an Ethernet cable from the UNI-D1 port on your nbn Connection Box into the blue WAN port on your TP-Link router.
Note: if UNI-D1 doesn't work, try each UNI-D port.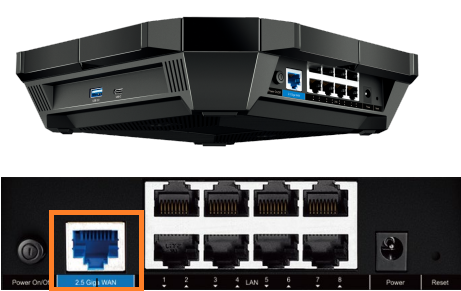
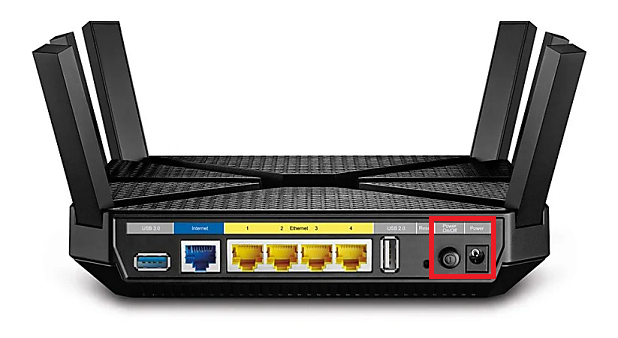
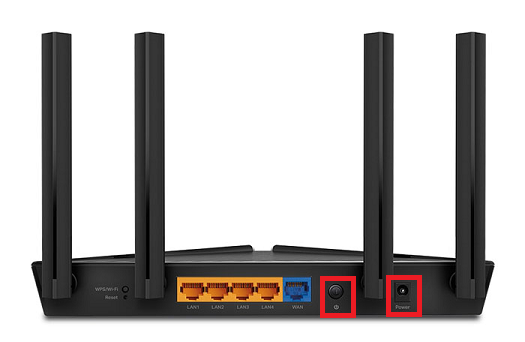
- Plug in the power cable and turn your AX6000 on using the Power button.
- Connect a device to your AX6000 via WiFi or Ethernet cable and go to http://192.168.1.1 in your browser.
- Log in with your TP-Link username and password. By default these are:
Username: admin
Password: admin - On the home screen, select Advanced and Network.
- Select Internet option.
- Select PPPoE as Internet Connection Type.
- Enter your iiNet Username and Password.
- Select IPTV option and enabled IPTV.
- Select Custom from ISP Profile.
- Enter 2 for Internet VLAN ID and 0 for Internet VLAN Priority and enable 802.1Q Tag.
- Select Save.
Your TP-Link AX6000 should now be online. If you're still having issues, please see Improving WiFi Signal or call us on 13 22 58 for further assistance.
Please follow the steps below to set up your TP-Link Archer VR900.
- Ensure your nbn Connection Box is turned on.
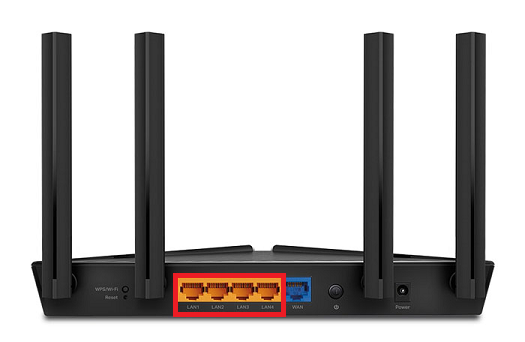
- Plug an Ethernet cable from the UNI-D1 port on your nbn Connection Box into the yellow LAN/WAN port on your TP-Link router.
Note: if UNI-D1 doesn't work, try each UNI-D port.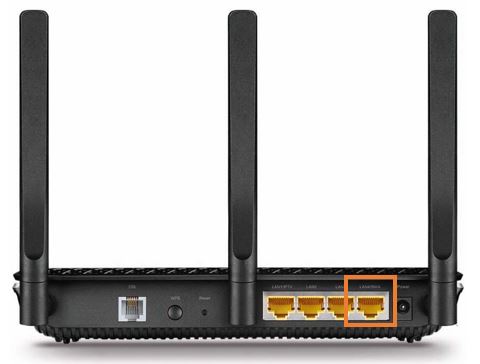
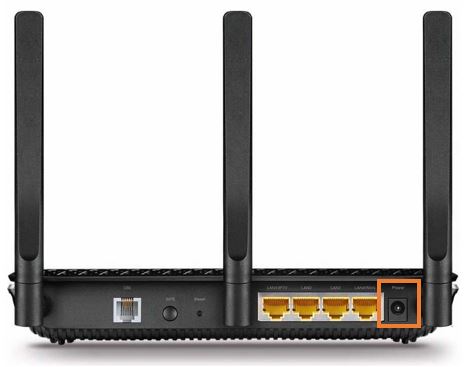
- Plug in the power cable and turn your TP-Link on using the Power button on the side.
- Connect a device to your TP-Link via WiFi or Ethernet cable and go to http://192.168.1.1 in your browser.
- Log in with your TP-Link username and password.
- On the home screen, select Advanced and Operation Mode.
- Select Wireless Router Mode.
- Click Save and the TP-Link will reboot to save the changes.
- Select Basic then select Internet.
- Select PPPoE as Connection Type.
- Tick the Enable checkbox for VLAN ID and enter 2.
- Select PPPoE for Internet Connection Type.
- Enter your iiNet Username and Password.
- Click Save.
Your TP-Link Archer VR900 should now be online. If you're still having issues, please see Improving WiFi Signal or call us on 13 22 58 for further assistance.
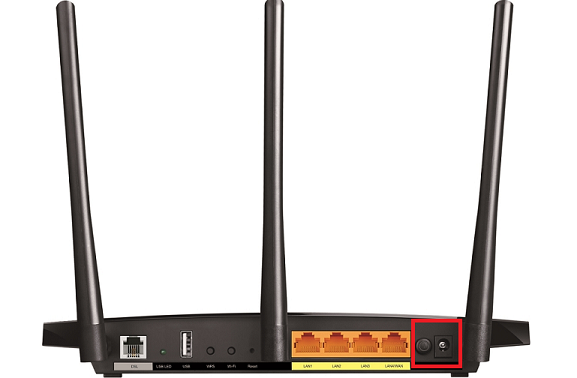
Please follow the steps below to set up your TP-Link Archer VR400.
- Ensure your nbn Connection Box is turned on.
- Plug an Ethernet cable from the UNI-D1 port on your nbn Connection Box into the yellow LAN/WAN port on your TP-Link router.
Note: if UNI-D1 doesn't work, try each UNI-D port.
- Plug in the power cable and turn your TP-Link on using the Power button.
- Connect your computer or any device to your modem by plugging an Ethernet cable from the device to the Ethernet port, or you can connect your device via WiFi.

- Go to 192.168.1.1 or http://tplinkmodem.net in your browser.
- Log in with your TP-Link username and password. By default, these are:
- Username: admin
Password: admin
Note: You may be prompted to create a new password. Ensure this flags as High and click Let’s Get Started to log in - Select Advanced > Operation Mode > Wireless Router Mode. and
- Click Save.
Note: The modem router will reboot. - Select Basic > Internet.
- Select Other from the ISP list.
- If your nbn plan was activated before 1 March 2023 or you have nbn Phone included in your service, more settings are needed. Tick the Enable checkbox for VLAN ID and enter 2.
- Select PPPoE as the Internet Connection Type.
- Enter your iiNet Username and Password.
- Click Save.
Your TP-Link Archer VR400 should now be online. If you're still having issues, please see Improving WiFi Signal or call us on 13 22 58 for further assistance.
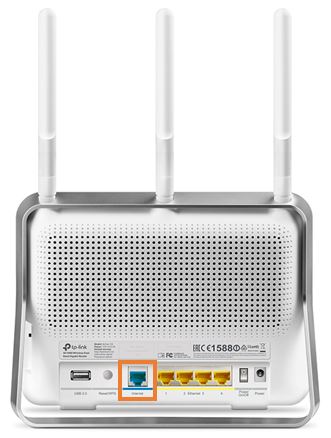
Please follow the steps below to set up your TP-Link Archer C9.
- Ensure your nbn Connection Box is turned on.
- Plug an Ethernet cable from the UNI-D1 port on your nbn Connection Box into the blue Internet port on your TP-Link router.
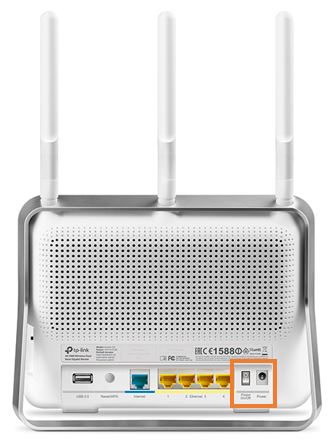
- Plug in the power cable and turn your TP-Link on using the Power button.
- Connect a device to your TP-Link via WiFi or Ethernet cable and go to http://192.168.0.1 in your browser.
- Log in with your TP-Link username and password.
- Select Advanced, Network then Internet.
- Select PPPoE for Internet Connection Type.
- Enter your iiNet Username and Password.
- Click Save.
- If your nbn plan was activated before 1 March 2023 or you have nbn Phone included in your service, more settings are needed:
- Select IPTV/VLAN.
- Select Wireless Router Mode.
- Tick the Enable checkbox for IPTV/VLAN.
- Select Custom for ISP Profile.
- Enter 2 in the textbox next to Internet VLAN ID.
- Enter 0 (zero) in the textbox next to Internet VLAN Priority.
- Tick the checkbox for 8021Q Tag.
- Enter any random number between 2 and 4049 for IP-Phone VLAN ID and IPTV VLAN ID.
- Click Save.
Your TP-Link Archer C9 should now be online. If you're still having issues, please see Improving WiFi Signal or call us on 13 22 58 for further assistance.
Please follow the steps below to set up your TP-Link Archer C4000.
- Ensure your nbn Connection Box is turned on.
- Plug an Ethernet cable from the UNI-D1 port on your nbn Connection Box into the blue Internet port on your TP-Link router.
- Plug in the power cable and turn your TP-Link on using the Power button.
- Connect a device to your TP-Link via WiFi or Ethernet cable and go to http://192.168.0.1 in your browser.
- Log in with your TP-Link username and password.
- Select Advanced, Network then Internet.
- Select PPPoE for Internet Connection Type.
- Enter your iiNet Username and Password.
- Click Save.
- Select IPTV.
- Tick the Enable checkbox for IPTV.
- Select Custom for ISP Profile.
- If your nbn plan was activated before 1 March 2023 or you have nbn Phone included in your service, more settings are needed:
- Enter 2 in the textbox next to Internet VLAN ID.
- Enter 0 (zero) in the textbox next to Internet VLAN Priority.
- Tick the checkbox for 8021Q Tag.
- Enter any random number between 2 and 4049 for IP-Phone VLAN ID and IPTV VLAN ID.
- Click Save.
Your TP-Link Archer C4000 should now be online. If you're still having issues, please see Improving WiFi Signal or call us on 13 22 58 for further assistance.
Please follow the steps below to set up your TP-Link Archer AX10.
- Ensure your nbn Connection Box is turned on.
- Plug an Ethernet cable from the UNI-D1 port on your nbn Connection Box into the blue WAN port on your TP-Link router.
Note: if UNI-D1 doesn't work, try each UNI-D port.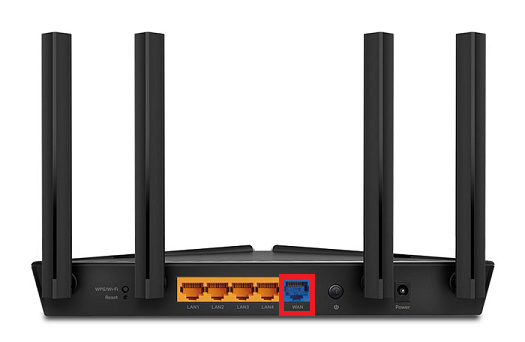
- Plug in the power cable and turn your TP-Link router on using the Power button.
- Connect your computer or any device to your modem by plugging an Ethernet cable from the device to the Ethernet port, or you can connect your device via WiFi.
- Go to 192.168.1.1 or http://tplinkmodem.net in your browser.
- Log in with your TP-Link username and password. By default, these are:
Username: admin
Password: admin
Note: You may be prompted to create a new password. Ensure this flags as High and click Let’s Get Started to log in - Click on the Internet tab.
- Select PPPoE as Internet Connection Type
- Enter your iiNet username and Password
- Click Save.
- If your nbn plan was activated before 1 March 2023 or you have nbn Phone included in your service, more settings are needed:
- Go to Advanced > Network > IPTV/VLAN.
- Tick the Enable checkbox for IPTV/VLAN and select Custom from the ISP Profile.
- Enter "2" for Internet VLAN ID and "0" for Internet VLAN Priority and enable 802.1Q Tag.
- Click Save.
Your TP-Link Archer AX10 should now be online. If you're still having issues, please see Improving WiFi Signal or call us on 13 22 58 for further assistance.
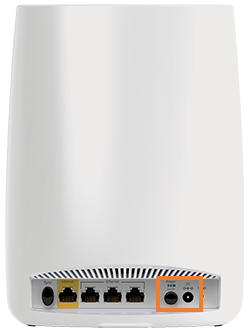
Please follow the steps below to set up your Netgear Orbi RBK50.
Important: Before you get started, ensure your Orbi is running on the latest firmware from Netgear.
- Ensure your nbn Connection Box is turned on.
- Plug an Ethernet cable from the UNI-D1 port on your nbn Connection Device into the yellow Internet port on your Orbi.
Note: If UNI-D1 doesn't work, try each UNI-D port.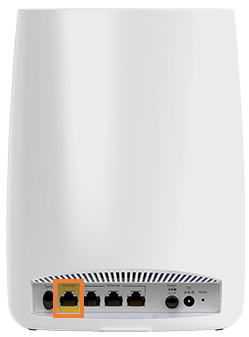
- Plug in the power cable and turn your Orbi on using the Power button.
- Connect a device to your Orbi via WiFi or Ethernet cable and go to http://192.168.0.1 or http://www.routerlogin.net in your browser.
- Log in with your Netgear username and password. By defaults these are:
Username: admin
Password: password - On the home screen, click Advanced.
- Click Setup.
- Click Internet Setup.
- Click Yes under Does your Internet connection require a login?
- Select PPPoE as Internet Service Provider.
- Enter your iiNet username and password.
- Click Apply.
- If your nbn plan was activated before 1 March 2023 or you have nbn Phone included in your service, more settings are needed:
- Click Advanced Setup.
- Click VLAN/Bridge Settings.
- Enable VLAN/Bridge group.
- Select By VLAN tag group.
- Enter 2 in VLAN ID.
- Enter 0 in Priority.
- Leave the other settings as they are and click Apply.
Your Netgear Orbi RBK50 should now be online. If you're still having issues, please see Improving WiFi Signal or call us on 13 22 58 for further assistance.
Please follow the steps below to set up your Netgear Nighthawk RAX120.
- Ensure your nbn Connection Box is turned on.
- Plug an Ethernet cable from UNI-D1 on your nbn Connection Box into the Internet/WAN port on your Nighthawk router.
Note: If UNI-D1 doesn't work, try each UNI-D port.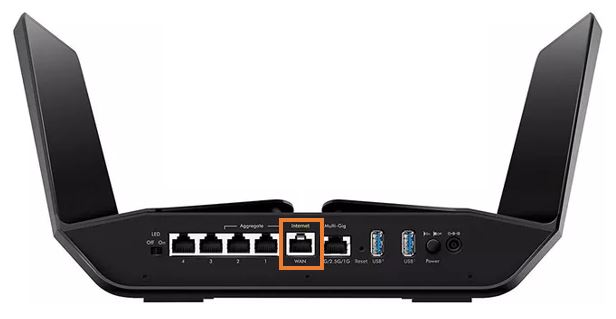
- Plug in the power cable and turn your Nighthawk on using the Power button.

- Connect a device to your Nighthawk via WiFi or Ethernet cable and go to http://192.168.1.1 or http://www.routerlogin.net in your browser.
- Log in with your Nighthawk username and password. By defaults these are:
Username: admin
Password: password - Select Internet Port for WAN Preference.
- Select PPPoE (PPP over Ethernet) from the Encapsulation drop down.
- Enter your iiNet username and password.
- Click Apply.
- If your nbn plan was activated before 1 March 2023 or you have nbn Phone included in your service, more settings are needed:
- Select Advanced, Advanced Setup and VLAN/Bridge Settings.
- Enable VLAN/Bridge Setup check box.
- Select By VLAN tag group.
- Click Add.
- Enter a Name for the VLAN (e.g. "Internet").
- Enter 2 in VLAN ID.
- Enter 0 in Priority and Add.
- Click Apply.
Your Netgear Nighthawk RAX120 should now be online. If you're still having issues, please see Improving WiFi Signal or call us on 13 22 58 for further assistance.