iiNet's Remote ID Validation Tool helps to protect you from a transaction being made using your identity without your permission.
How does it work?
We will SMS you a link to the iiNet Remote ID Validation Tool. From there, you will be guided through each step. You will be asked to:
- Take and upload a photograph of your identification document (Australian driver’s licence, Passport of any country or Proof of Age Card)
- Confirm that the written information collected from your ID is correct.
- Take and upload a brief video to establish that you are the owner of the identification provided.
To participate in this remote validation process, you will need to expressly consent to us collecting and using your personal information (including any sensitive information) for this purpose. Check out our Privacy Statement for details on how we handle your personal information.
How do we use the data?
The iiNet Remote ID Validation Tool uses biometric measurements from your photo and compares it to your ID to validate a match. It also completes a number of checks on the security features of your ID document to ensure it is legitimate.
Check out our Privacy Statement for details on how we handle your personal information.
At iiNet, we're continuing to make significant investments to protect our customers and their personal information.
The challenging reality is that all Australian companies face cyberthreats on a daily basis. iiNet takes cybersecurity and the protection of our customer’s personal information seriously. In light of recent events, we have been working closely with our cyber security partners and relevant government agencies to increase checks and monitoring of our systems.
For more information on iiNet’s data security policies and practices, view our relevant support articles:
- Security Information
- Privacy Statement
- Fraud Assistance
- Scams and Hoaxes
- Multi-Factor Authentication
Select one of the links below to jump to a query:
- Protecting yourself and your personal information
- Tips to help keep your information secure
- What is Phishing?
- How to tell whether a call you’ve received is legitimate
- Frequently asked questions
- What is iiNet doing to ensure the safety of my personal information and data?
- What information of mine do you have in your system?
- Who can see my personal information and data?
- I am no longer an iiNet customer, can you delete my personal information and data?
- What can I do to protect myself against fraud?
- I transfered my Optus mobile number to iiNet and now want to change my number. Will this affect my credit file?
- Can I make my service non-transferable and ban SIM swaps?
- Can you make sure that no additional services or connections are created in my name?
- How do I know if it’s safe to send my photo ID through to iiNet?
Protecting yourself and your personal information
iiNet is continuing to take important measures to protect your information, but there are also tactics you can use to protect yourself and reduce your risk of becoming a victim by understanding how to spot a suspicious email, call or SMS.
Tips to help keep your information secure
- Do not provide your password, or one-time passcodes to someone who called you.
- Don’t hesitate to question the legitimacy of a caller. If you ever receive a call claiming to be iiNet and you are unsure of the legitimacy, hang up and call us on 13 22 58.
- Double check the sender of an email before responding or clicking on any links.
- Please ensure all of the details in an order confirmation SMS are correct before responding. Decline even if there is a slight discrepancy.
- When chatting to us on social media, always look out for the blue tick.
- While on our website, you may receive a pop up asking you to chat with us, please ensure you are always using the official iiNet website.
What is Phishing?
Phishing is a method used by criminals to obtain your sensitive information such as your mobile number, date of birth, passwords, and security codes.
Different methods include:
- SMS and emails posing as having come from legitimate companies asking you to click on links & fill out your security, personal or payment details.
- Scammers may call you posing as your telecommunications provider offering a free phone or a sizeable discount on a device. They will phish for your personal details such as your PIN, your password, or your one-time passcodes. This enables the scammers to impersonate you or gain access to your online accounts to phish for additional private information or to process orders on your behalf. If successful, the scammer may call you again posing as iiNet requesting your credit card details to provide a refund or compensation for the fraud.
- Online browser pop up scams that entice customers with the possibility of winning a prize.
- Calls pretending to be from various reputable organisations like a government agency, bank, or energy company, that either threaten action against you or offer heavily discounted or free products to scare or entice customers into voluntarily disclosing their security, personal or payment details.
How to tell whether a call you’ve received is legitimate
- When we call you, we will not ask for a one-time passcode sent to your mobile or email, to verify you.
- We will never call you and ask for your credit card details for refunds, reimbursements, or compensation.
- Any refunds or reimbursements will only be provisioned through your original method of payment.
- We will never call you from a private number.
- If you order a device over the phone or online, we will send you a confirmation SMS with the details of your order including your preferred delivery address.
- We will never proactively reach out to you on social media, we will only ever respond to you, if you contact us.
Frequently asked questions
What is iiNet doing to ensure the safety of my personal information and data?
We take cybersecurity extremely seriously at iiNet and continue to make significant investments to help protect our customers and their personal information. Our Cyber Defence and Response Centre provides around-the-clock event monitoring, threat protection and intelligence, to help protect customer’s data and our services against online security threats.
iiNet has processes and procedures in place to manage the security of its customer data and help protect it from unauthorised use, access, modification or disclosure. These include a range of physical and electronic security measures. We also use multi-factor authentication for complex and more involved customer service transactions which you can read about in our support article.
What information of mine do you have in your system?
There are requirements under the Privacy Act, and other legislation, about what information we are required to keep. You can see more information regarding our Privacy Statement on our Privacy Statement page. If you wish to request a copy of your information listed with us, you can complete the Personal Information Request form via the above link.
Who can see my personal information and data?
Our customer’s privacy is extremely important to us. Customer personal information can only be seen and used by staff who need it to do their jobs and provide services to you.
I am no longer an iiNet customer, can you delete my personal information and data?
If we no longer need personal information for the purpose for which it was collected, and if Australian law does not require us to retain that personal information, we are required to destroy or de-identify the information in line with the Privacy Act.
We have strict measures in place to ensure that your personal information can only be seen and used by staff who need it to do their jobs. You can see more information regarding our Privacy Statement on our Privacy Statement page.
What can I do to protect myself against fraud?
Watch out for suspicious calls, SMS and emails asking for your personal information. It is always best to contact the legitimate company if you’re unsure. If you suspect you’ve been a victim of fraud, you should immediately contact your financial service provider. We also have tips on how to keep your personal details safe in our Security Information article.
You can also find valuable information on how to protect yourself from fraud at the websites for the Office of the Australian Privacy Commissioner and Scamwatch.
I transfered my Optus mobile number to iiNet and now want to change my number. Will this affect my credit file?
We can assist you with changing your mobile number. Simply changing your mobile number will not affect your credit file. However, we will need to place an enquiry on your credit file if you have requested a new service and a credit check is applicable. To change your number, please contact us on 13 22 58.
Can I make my service non-transferable and ban SIM swaps?
All service providers have obligations before accepting a transfer request. If someone requests your number to be transferred to us, a 2-way SMS is sent to the number that is being transferred. The transfer will only proceed if the SMS is responded to with the correct code. If you receive a message to transfer your service to another provider that you did not request, please do not respond to the message, and contact your provider as soon as possible. If you receive a message from another provider and you’re with us, contact the provider to request the transfer request is cancelled and let us know.
Keep in mind we are held to industry regulations which don’t allow us to stop numbers being transferred away from us. We are required to give customers freedom of choice for their mobile provider and are not permitted to stop a request to transfer a number out from our network.
SIM swaps can only be processed either through a secure link sent directly to your mobile number. If you receive a link to log in to Toolbox that you didn’t request, please let us know. It’s important be on the look-out for calls or messages requesting information, if this happens, please do not provide your personal information or any links.
Can you make sure that no additional services or connections are created in my name?
We have multi-factor-authentication (MFA) in place for the more involved or complex service requests, to protect your account and information. Before you can add an additional service to your account, we will send you a one-time code before allowing the transaction to proceed. You can read more about MFA in our article.
How do I know if it’s safe to send my photo ID through to iiNet?
Sometimes if we’re unable to verify you and you can’t visit a store, or you’re activating a new service, we may need you to provide documentation so that we can verify you to assist with account queries. We have strict requirements about the use and protection of your details. We have strict measures in place to ensure that your personal information can only be seen and used by those who need it to do their jobs.
Our 3G network is closing down
We’re going full 4G and 5G, which means our 3G network will be switched off by the end of 2023. But don’t worry - better connectivity is already here.
At iiNet we are always working hard to bring you faster speeds and new features on our mobile network.
Our 4G network now covers more than 24 million Australians and our state-of-the-art 5G network is stronger than ever.
With superior speeds and greater connectivity available across these networks, we are now preparing to switch off our legacy 3G mobile network by the end of 2023.
If you are an iiNet customer or business using 3G, it is time to upgrade to a new device that can work on 4G and 5G networks.
Our priority is to keep our remaining 3G customers connected and help ensure they make a smooth transition to 4G or 5G before the December 2023 switch-off date.
Frequently asked questions
When is the 3G network shutting down?
iiNet will switch off its 3G network on 15 December 2023.
What do I need to do?
The vast majority of our customers do not have to do anything at all and will continue accessing our 4G and 5G networks as they do today.
A very small number of our customers have 3G-only handsets, tablets and connected devices and they will need to upgrade those devices before December 2023.
Some 4G handsets may also need settings changes to be able to continue to make and receive voice calls using our 4G network.
Why is 3G closing?
Mobile carriers around the world are closing down their 3G networks as more advanced 4G and 5G network services become widespread. Our 4G and 5G networks are more efficient at delivering greater speed and capacity, which means better service and experience for customers.
Similar shutdowns have happened before. All Australian mobile networks switched off their 2G networks a few years ago when they upgraded to 4G.
iiNet's licence to access the 3G spectrum (the invisible electromagnetic frequencies that transmit mobile data) is set to expire in mid-2024. Although most customers rarely need to access 3G, we want to make sure customers have the appropriate notice and offer support to those who need assistance.
What devices are affected by the 3G closure?
All 3G-only devices (including phones, tablets and mobile broadband devices) and in rare cases, some older 4G phones, will be affected.
Some older 4G phones that do not have a feature called 'VoLTE' (Voice over Long Term Evolution) will not be able to make and receive voice calls.
Please contact your device manufacturer if you are unsure of your device’s specific capabilities.
I have a 3G phone, how does this affect me?
If you have a 3G-only phone then you will no longer be able to make calls, send texts or access the internet on your phone when the 3G network switches off.
You will still be able to make emergency 000 calls on other 3G networks when in coverage.
WiFi internet access is still possible.
We recommend you upgrade your phone to a 4G or 5G compatible device to continue having mobile service.
Will 4G/5G network coverage differ from 3G coverage?
Our 4G coverage is similar in size and reach to our 3G coverage and our 5G coverage is growing every day. Check our 4G and 5G coverage maps.
Does this only affect phones?
No. Other devices like tablets, mobile broadband modems, smart watches, some home security systems, and other connected devices might also be using 3G services.
Please contact your device manufacturer if you are unsure of your device’s specific capabilities.
What is VoLTE and how do I switch it on?
Voice over LTE (VoLTE) is a feature that allows you to make voice calls using our 4G network.
You might need to turn the VoLTE setting ON. Please check your device manufacturer’s support website if you are unsure of your device’s specific capabilities.
Android devices
If you have a Samsung device, Voice over LTE should automatically be enabled. If you’ve previously disabled VoLTE and want to re-enable it, or would like to check if it’s enabled on your Android device, please go to your Settings > Mobile Networks.
Apple devices
If you have an Apple device iPhone 6 or later, Voice over LTE should be automatically enabled. To check this or manually enable it, please go to the settings in your iPhone – Settings > Mobile > Mobile Data options > Voice and Data.
What should I do with my old 3G device?
The best way to recycle your old device is with Mobile Muster, the Australian mobile industry's official recycling scheme. Alternatively, please consider eWaste recycling facilities which may be offered by your local council.
Please follow the steps below to set up your TP-Link Deco.
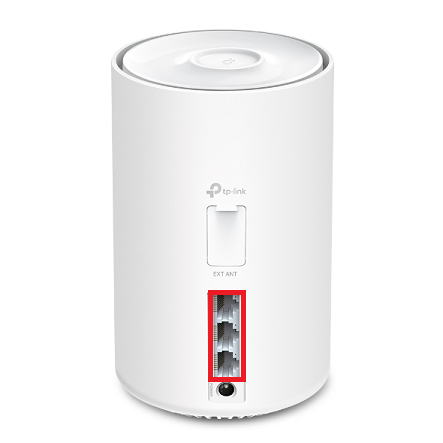
Please note: Most TP-Link Deco modems have at least 2 Ethernet ports that can be used for setup purposes.
- Ensure your nbn Connection Device is turned on.
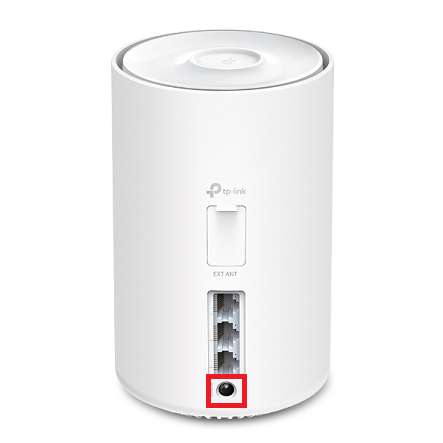
- Turn on the TP-Link Deco by plugging in the provided power supply into the power port.
- Plug an Ethernet cable from the yellow Gateway port on your nbn Connection Device into one of the Ethernet ports on your TP-Link Deco.
- Scan the QR code below or go to Google Play or the Apple App Store to download the Deco app.
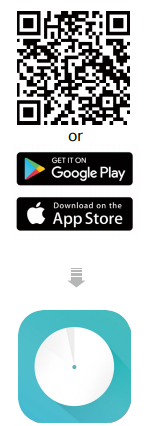
- Install the app on your Android or iOS smartphone or tablet.
- Turn on Bluetooth on your smartphone or tablet.
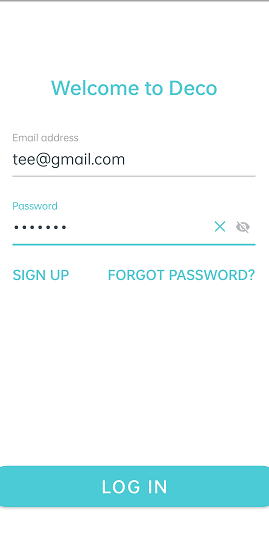
- Open the app. Use your TP-Link ID to log in. If you don’t have a TP-Link ID, select Sign Up.
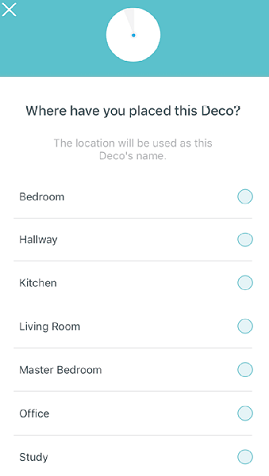
- Your smartphone will attempt to find and link to TP Link Deco. Once linked you can assign your TP-Link Deco to a room.
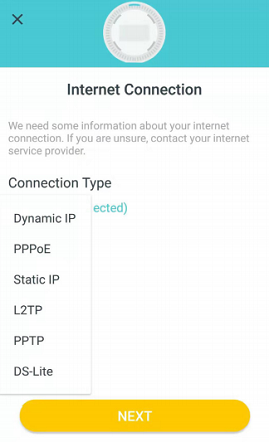
- Your TP-Link Deco should detect PPPoE automatically. Manually set to PPPoE if not.
- Set a Network name and a Password.
Note: These will be the name and password you use to connect your devices to WiFi.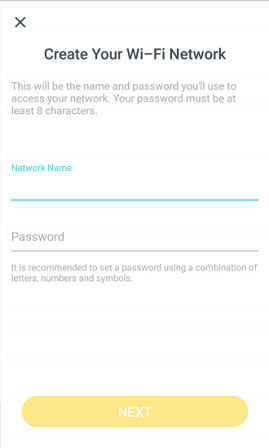
- Once connected to your Deco's WiFi network, log back into the TP-Link Deco App. Tap on the More icon and go to Advanced.
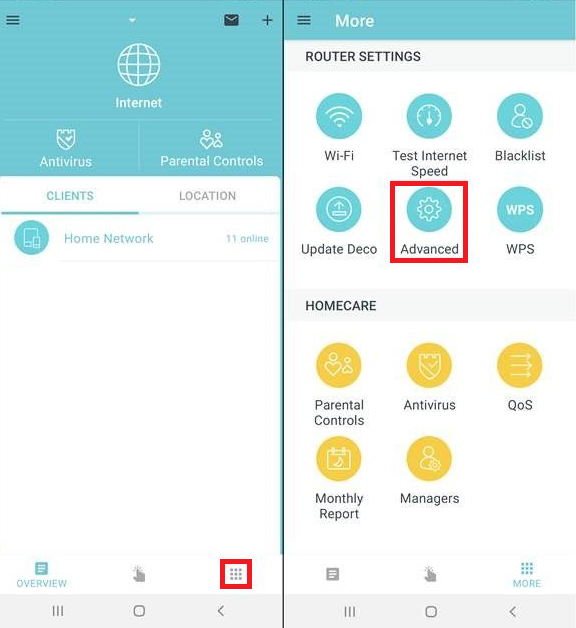
- Under advanced tap on IPv4. It should say PPPoE underneath.
- Disable “Ignore Ping from WAN" and tap on the back arrow.
Your TP-Link Deco should now be online. If you're still having issues, please see Improving WiFi Signal or call us on 13 22 58 for further assistance.
Please follow the steps below to set up your TP-Link Archer VR400.
- Ensure your nbn Connection Device is turned on.
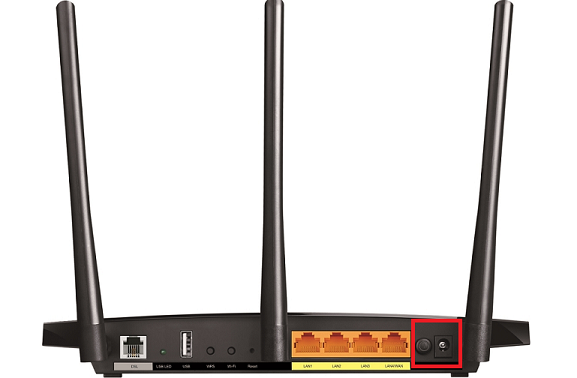
- Plug an Ethernet cable from the yellow Gateway port on your nbn Connection Device into the yellow LAN/WAN port on your TP-Link router.

- Plug in the power cable and turn your TP-Link on using the Power button.
- Connect your computer or any device to your modem by plugging an Ethernet cable from the device to the Ethernet port, or you can connect your device via WiFi.

- Go to 192.168.1.1 or http://tplinkmodem.net in your browser.
- Log in with your TP-Link username and password. By default, these are:
- Username: admin
Password: admin
Note: You may be prompted to create a new password. Ensure this flags as High and click Let’s Get Started to log in - Select Advanced > Operation Mode > Wireless Router Mode.
- Click Save.
Note: The modem router will reboot. - Select Basic > Internet.
- Select Other from the ISP list.
- If your nbn plan was activated before 1 March 2023 or you have nbn Phone included in your service, more settings are needed. Tick the Enable checkbox for VLAN ID and enter 2.
- Select PPPoE as the Internet Connection Type.
- Enter your iiNet Username and Password.
- Click Save.
Your TP-Link Archer VR400 should now be online. If you're still having issues, please see Improving WiFi Signal or call us on 13 22 58 for further assistance.
Please follow the steps below to set up your TP-Link Archer AX10.
- Ensure your nbn Connection Device is turned on.
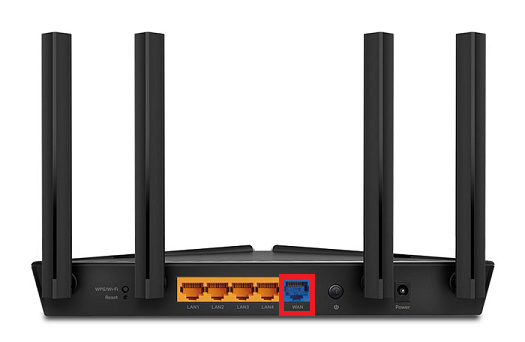
- Plug an Ethernet cable from the yellow Gateway port on your nbn Connection Device into the blue WAN port on your TP-Link router.
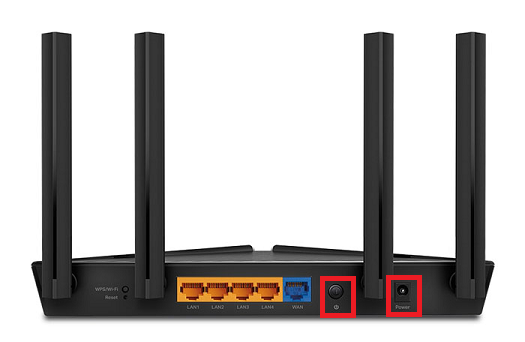
- Plug in the power cable and turn your TP-Link router on using the Power button.
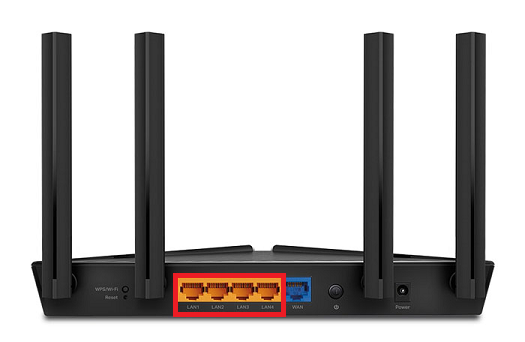
- Connect your computer or any device to your modem by plugging an Ethernet cable from the device to the Ethernet port, or you can connect your device via WiFi.
- Go to 192.168.1.1 or http://tplinkmodem.net in your browser.
- Log in with your TP-Link username and password. By default, these are:
Username: admin
Password: admin
Note: You may be prompted to create a new password. Ensure this flags as High and click Let’s Get Started to log in - Click on the Internet tab.
- Select PPPoE as Internet Connection Type
- Enter your iiNet username and Password
- Click Save.
- If your nbn plan was activated before 1 March 2023 or you have nbn Phone included in your service, more settings are needed.
- Go to Advanced > Network > IPTV/VLAN.
- Tick the Enable checkbox for IPTV/VLAN and select Custom from the ISP Profile.
- Enter "2" for Internet VLAN ID and "0" for Internet VLAN Priority and enable 802.1Q Tag.
- Click Save.
Your TP-Link Archer AX10 should now be online. If you're still having issues, please see Improving WiFi Signal or call us on 13 22 58 for further assistance.
Please follow the steps below to set up your D-Link COVR-1102.
- Ensure your nbn Connection Box is turned on.
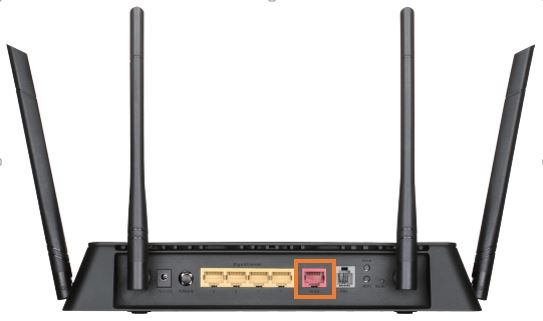
- Plug an Ethernet cable from the UNI-D1 port on your nbn Connection Box into the Internet port on your D-Link router.
Note: if UNI-D1 doesn't work, try each UNI-D port.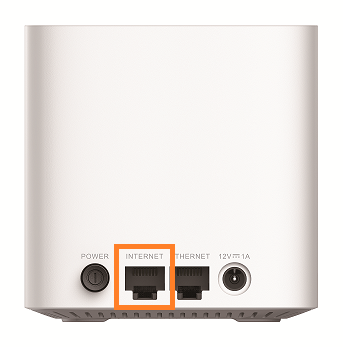
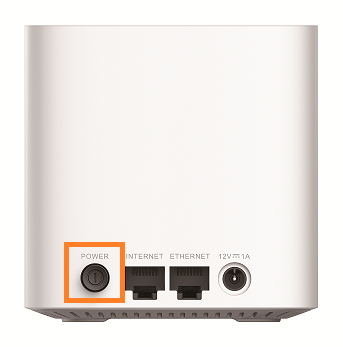
- Plug in the power cable and turn your COVR-1102 on using the Power button.
- Connect a device to your COVR-1102 via WiFi or Ethernet cable and go to http://covr.local or http://192.168.1.1 in your browser.
- Click Go to Settings and Internet.
- Select PPPoE from My Internet Connection is.
- Enter your iiNet username and password.
- Select Save.
- If your nbn plan was activated before 1 March 2023 or you have nbn Phone included in your service, more settings are needed:
- Click VLAN option from Internet Settings.
- Enable Triple Play Status and Priority ID.
- Enter 2 in Internet VLAN ID and 0 in Priority ID. - Click Save at the end of the Wizard.
Your D-Link COVR-1102 should now be online. If you're still having issues, please see Improving WiFi Signal or call us on 13 22 58 for further assistance.
Please follow the steps below to set up your D-Link DSL-2878.
- Ensure your nbn Connection Box is turned on.
- Plug an Ethernet cable from UNI-D1 port on your nbn Connection Box into the yellow LAN/WAN port on your D-Link router.
Note: if UNI-D1 doesn't work, try each UNI-D port.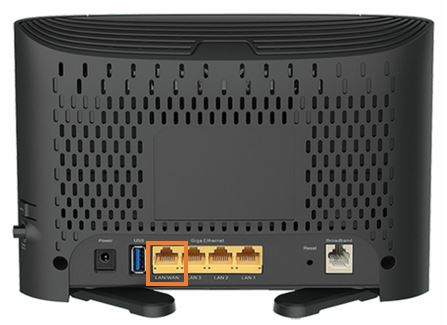
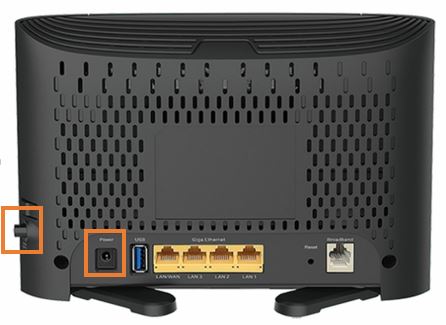
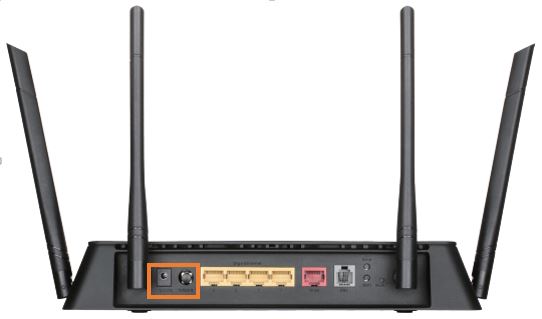
- Plug in the power cable and turn your DSL-2878 on using the Power button on the side.
- Connect a device to your DSL-2878 via WiFi or Ethernet cable and go to http://192.168.1.1 in your browser.
- Select Settings then select Internet.
- Select Ethernet as Configure your WAN connection.
- Select Advanced Settings.
- Enter 2 for Vlan ID.
- Select PPPoE for Connection.
- Enter your iiNet username and password.
- Click Save.
Your D-Link DSL-2878 should now be online. If you're still having issues, please see Improving WiFi Signal or call us on 13 22 58 for further assistance.
Please follow the steps below to set up your D-Link DSL-3900.
- Ensure you nbn Connection Box is turned on.
- Plug an Ethernet cable from the UNI-D1 port on your nbn Connection Box into the red WAN port on your D-Link router.
- Plug in the power cable and turn your DSL-3900 on using the Power button.
- Connect a device to your DSL-3900 via WiFi or Ethernet cable and go to http://192.168.1.1 in your browser.
- Enter your D-Link password (if this was not changed, by default the password field is left blank).
- Select Settings then select Internet.
- Select Ethernet as Configure your WAN connection.
- If your nbn plan was activated before 1 March 2023 or you have nbn Phone included in your service, more settings are needed:
- Select Enabled for Enable Vlan ID.
- Enter 2 for VLAN ID. - Select PPPoE for Connection.
- Enter your iiNet username and password.
- Click Save.
Your D-Link DSL-3900 should now be online. If you're still having issues, please see Improving WiFi Signal or call us on 13 22 58 for further assistance.
Please follow the steps below to set up your Netgear Nighthawk AX5.
Before you install your router, attach the antennas to the router.
Note: Make sure to match the labels on the antennas with the labels on the router. The antennas must be attached to the correct antenna ports on the router. After you are done attaching the antennas, follow the steps below to connect your service.
- Ensure your nbn Connection Device is turned on.
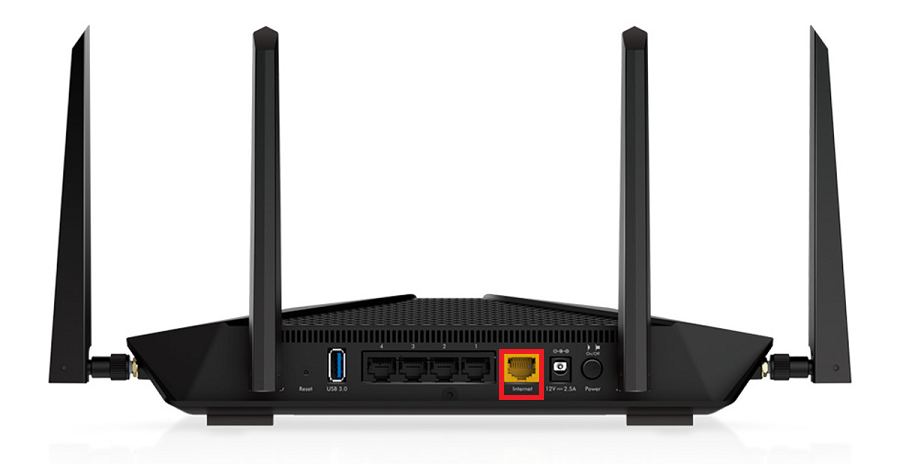
- Plug an Ethernet cable from the yellow Gateway port on your nbn Connection Device into the yellow Internet port on your Netgear Nighthawk AX5.
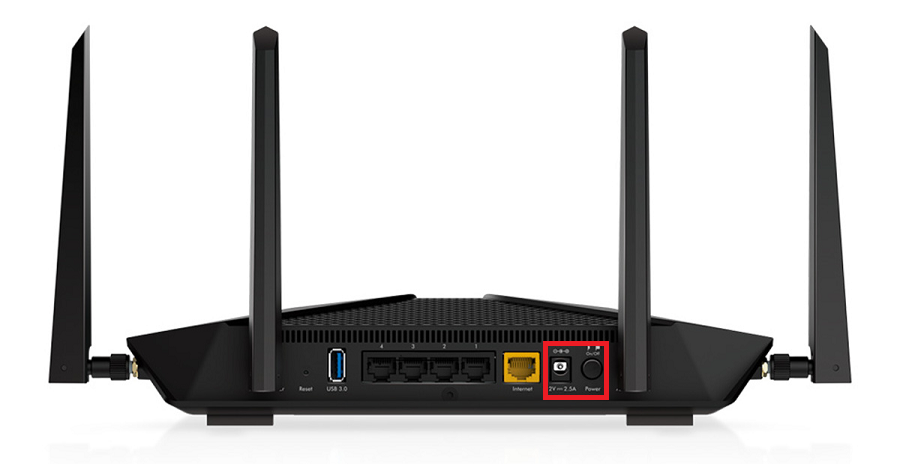
- Plug in the power cable and turn your Nighthawk on using the Power On-Off button.
- Connect your computer or any device to your modem by plugging an Ethernet cable from the device to one of the LAN ports, or you can connect your device via WiFi.

- Go to http://192.168.1.1 or to http://www.routerlogin.com in your browser.
- Log in with your Netgear username and password. By default these are:
Username: admin
Password: password - On the home screen, click BASIC.
- Click Internet.
- In Does your Internet connection require a login? section, select the Yes radio button.
- From the Internet Service Provider menu, select the encapsulation method PPPoE.
- Enter your iiNet username and password.
- From the Connection Mode menu, select Always On.
- To change the number of minutes until the Internet login times out, in the Idle Timeout (In minutes) field, type the number of minutes. This is how long the router keeps the Internet connection active when no one on the network is using the Internet connection. A value of 0 (zero) means never log out.
- Select an Internet IP Address radio button: Get Dynamically from ISP
- Select a Domain Name Server (DNS) Address radio button:
- Get Automatically from ISP. Your ISP uses DHCP to assign your DNS servers. Your ISP automatically assigns this address.
- Use These DNS Servers. If you know that your ISP requires specific servers, select this option. Enter the IP address of your ISP’s primary DNS server. If a secondary DNS server address is available, enter it also.
- Select a Router MAC Address radio button:
- Use Default Address. Use the default MAC address.
- Use Computer MAC Address. The router captures and uses the MAC address of the computer that you are now using. You must use the one computer that the ISP allows.
- Use This MAC Address. Enter the MAC address that you want to use.
- Click Apply to save the settings.
- If your nbn plan was activated before 1 March 2023 or you have nbn Phone included in your service, more settings are needed:
- Select ADVANCED > Advanced Setup > VLAN/Bridge Settings and tick the Enable VLAN/Bridge Setup check box.
- Select the By VLAN tag group button and then click the Add button.
- The Add VLAN Rule page displays.
- Enter a name for the VLAN tag group (e.g. iiNet). The name can be up to 10 characters.
- For VLAN ID, enter 2 and set Priority to 0. - Click the Test button to test your Internet connection.
Your Netgear Nighthawk AX5 should now be online. If you're still having issues, please see Improving WiFi Signal or call us on 13 22 58 for further assistance.